- [ERP 개발 일지] 직원 리스트 출력에서 정보 보기2024년 12월 09일 17시 28분 41초에 업로드 된 글입니다.작성자: Devrun반응형

기존에 직원 정보는 위와 같이 출력되었다. 여기서 사용자가 직원의 상세 정보를 보기 위해 검색을 하는 것보다 버튼 2개를 추가하여 진행하는 것이 좋을 것 같다는 생각이 들었다. 그래서 아래와 같이 변경했다.

기존 리스트뷰에 버튼 두개를 추가했고, 이를 통해 정보 보기를 누르면 상세 정보 페이지로 넘어가게 된다.
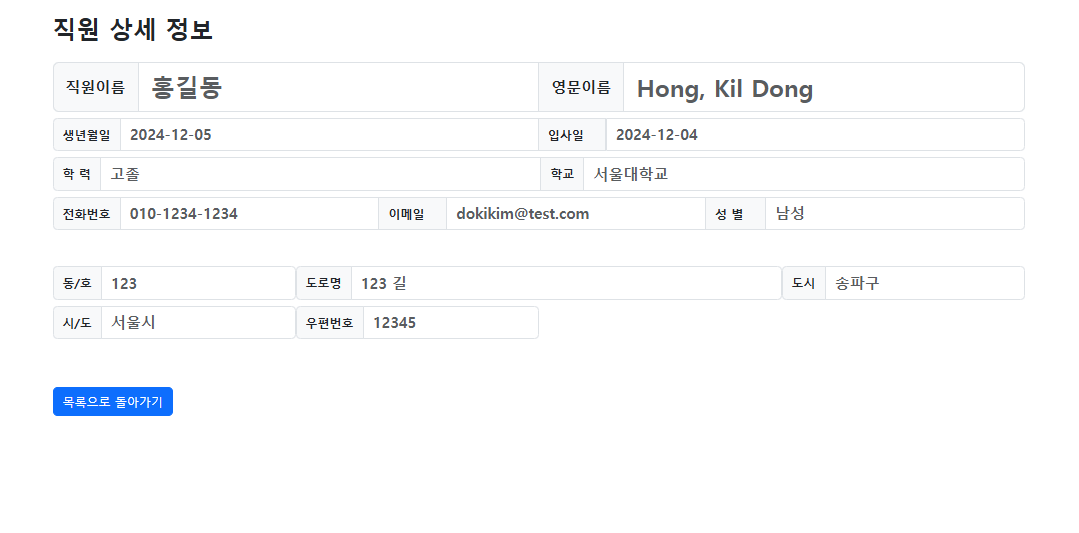
상세 정보 보기 창으로 오면 위와 같이 나온다. 이제 코드에 대해 설명하겠다.
        //Detail
        public async Task<IActionResult> Details(int id)
        {
            var employee = await _context.Employees
                .Include(e => e.EmployeeEducation)
                .Include(e => e.EmployeeAddress)
                .FirstOrDefaultAsync(e => e.Employee_ID == id);

            if (employee == null)
            {
                return RedirectToAction("Index");
            }

            // Add Data To View Model
            var employeeViewModel = new EmployeeViewModel
            {
                Employee_ID = employee.Employee_ID,
                Employee_Name = employee.Employee_Name,
                Employee_Phone = employee.Employee_Phone,
                Employee_Email = employee.Employee_Email,
                Employee_DateOfBirth = employee.Employee_DateOfBirth,
                Employee_JoinDate = employee.Employee_JoinDate,
                Employee_Sex = employee.Employee_Sex,
                Employee_English_Name = employee.Employee_Englisth_Name,
                School_Name = employee.EmployeeEducation?.School_Name ?? "N/A",
                EducationStatus = employee.EmployeeEducation?.EducationStatus ?? "N/A",
                Unit = employee.EmployeeAddress?.Unit ?? "N/A",
                StreetName = employee.EmployeeAddress?.StreetName ?? "N/A",
                City = employee.EmployeeAddress?.City ?? "N/A",
                Province = employee.EmployeeAddress?.Province ?? "N/A",
                PostalCode = employee.EmployeeAddress?.PostalCode ?? "N/A"
            };

            return View("EmpDetail", employeeViewModel);
        }
전체 적인 코드는 위와 같다. 이제 하나씩 설명해보자.
        //Detail
        public async Task<IActionResult> Details(int id)
        {

        }
async를 사용해서 비동기 방식으로 실행되는 Details이라는 Method를 생성했다. 이 Method는 int형의 id를 받아온다. id는 직원 정보 보기 버튼을 클릭하면 해당 직원의 id를 가져와서 대입한다.
            var employee = await _context.Employees
                .Include(e => e.EmployeeEducation)
                .Include(e => e.EmployeeAddress)
                .FirstOrDefaultAsync(e => e.Employee_ID == id);
변수 Employee를 선언하고 해당 변수에 _context(db)에서 Employees 정보를 가져와서 대입한다. 그리고 관련된 데이터를 int id를 가지고 있는 EmployeeEducation과 EmployeeAddress 정보를 받아온다.
          if (employee == null)
            {
                return RedirectToAction("Index");
            }
받아온 데이터가 null일 경우 초기 페이지인 Index로 넘어가게 한다.
var employeeViewModel = new EmployeeViewModel
            {
                Employee_ID = employee.Employee_ID,
                Employee_Name = employee.Employee_Name,
                Employee_Phone = employee.Employee_Phone,
                Employee_Email = employee.Employee_Email,
                Employee_DateOfBirth = employee.Employee_DateOfBirth,
                Employee_JoinDate = employee.Employee_JoinDate,
                Employee_Sex = employee.Employee_Sex,
                Employee_English_Name = employee.Employee_Englisth_Name,
                School_Name = employee.EmployeeEducation?.School_Name ?? "N/A",
                EducationStatus = employee.EmployeeEducation?.EducationStatus ?? "N/A",
                Unit = employee.EmployeeAddress?.Unit ?? "N/A",
                StreetName = employee.EmployeeAddress?.StreetName ?? "N/A",
                City = employee.EmployeeAddress?.City ?? "N/A",
                Province = employee.EmployeeAddress?.Province ?? "N/A",
                PostalCode = employee.EmployeeAddress?.PostalCode ?? "N/A"
            };
기존에 우리가 만들어둔 ViewModel에 받아온 데이터를 모두 대입한다. 이는 View에서 다중 모델을 불러올 수가 없어 기존 모델 이외에 ViewModel을 사용해서 데이터를 받아온다. 이렇게 하면 원하는 모든 데이터를 View에 표시할 수 있다.
이 외에 다른 방법도 있지만... 난 초보 자니까 일단 아는 데로 했다.
return View("EmpDetail", employeeViewModel);이제 데이터가 있다면 EmpDetail이라는 뷰로 employeeViewModel을 반환시킨다. 그러면 우리가 받아온 데이터는 EmpDetail 뷰로 대입되게 된다.
@model EmployeeViewModel @{ ViewData["Title"] = "직원 상세 정보"; } <div class="container mt-5"> <h2 class="fw-bold mb-4">직원 상세 정보</h2> <div class="card border-0"> <form> <div class="input-group input-group-lg mb-2"> <span class="input-group-text fw-bold">직원이름</span> <input type="text" class="form-control fs-2 fw-bold" readonly placeholder="@Model.Employee_Name"> <span class="input-group-text fw-bold" id="inputGroup-sizing">영문이름</span> <input type="text" class="form-control fs-2 fw-bold" readonly placeholder="@Model.Employee_English_Name"> </div> <div class="input-group mb-2"> <span class="input-group-text fw-bold">생년월일</span> <input type="text" class="form-control fs-5 fw-bold" readonly placeholder="@Model.Employee_DateOfBirth"> <span class="input-group-text fw-bold">입사일 </span> <input type="text" class="form-control fs-5 fw-bold" readonly placeholder="@Model.Employee_JoinDate"> </div> <div class="input-group mb-2"> <span class="input-group-text fw-bold">학 력</span> <input type="text" class="form-control fs-5 fw-bold" readonly placeholder="@Model.EducationStatus"> <span class="input-group-text fw-bold">학교</span> <input type="text" class="form-control fs-5 fw-bold" readonly placeholder="@Model.School_Name"> </div> <div class="input-group mb-5"> <span class="input-group-text fw-bold">전화번호</span> <input type="text" class="form-control fs-5 fw-bold" readonly placeholder="@Model.Employee_Phone"> <span class="input-group-text fw-bold">이메일 </span> <input type="text" class="form-control fs-5 fw-bold" readonly placeholder="@Model.Employee_Email"> <span class="input-group-text fw-bold">성 별 </span> <input type="text" class="form-control fs-5 fw-bold" readonly placeholder="@Model.Employee_Sex"> </div> <div class="row g-0 mb-2"> <div class="col-md-3"> <div class="input-group"> <span class="input-group-text fw-bold">동/호</span> <input type="text" class="form-control fs-5 fw-bold" readonly placeholder="@Model.Unit"> </div> </div> <div class="col-md-6"> <div class="input-group"> <span class="input-group-text fw-bold">도로명</span> <input type="text" class="form-control fs-5 fw-bold" readonly placeholder="@Model.StreetName"> </div> </div> <div class="col-md-3"> <div class="input-group"> <span class="input-group-text fw-bold">도시</span> <input type="text" class="form-control fs-5 fw-bold" readonly placeholder="@Model.City"> </div> </div> </div> <div class="row g-0 mb-5"> <div class="col-md-3"> <div class="input-group"> <span class="input-group-text fw-bold">시/도</span> <input type="text" class="form-control fs-5 fw-bold" readonly placeholder="@Model.Province"> </div> </div> <div class="col-md-3"> <div class="input-group"> <span class="input-group-text fw-bold">우편번호</span> <input type="text" class="form-control fs-5 fw-bold" readonly placeholder="@Model.PostalCode"> </div> </div> </div> <a href="@Url.Action("Index", "Employee")" class="btn btn-primary mt-3">목록으로 돌아가기</a> </form> </div> </div>맨 위에 @Model에 보면 우리가 가져올 데이터를 가지고 있는 ViewModel이 선언되어 있고, 이를 통해 우리는 Razor Pages에서 데이터를 표시할 수 있다. 그리고 최종적으로 다시 목록으로 돌아가게 할 수 있는 버튼도 구현해 두었다.
이제 조금씩 하나씩 개발해 나가서 아마 다음 주쯤이면 어느 정도 완성이 되지 않을까 한다.
비록 포폴용으로 사용할 프로젝트이지만, 내가 좋아하는 분야를 만드는 것이 좋다!
반응형'C# > 개발일지' 카테고리의 다른 글
[개인 홈페이지] 이력서용으로 사용할 홈페이지 제작 (0) 2024.12.10 [ERP 개발일지] 직원 정보 입력, 출력 그리고 에러 (1) 2024.12.06 [ERP 개발 일지] 로그인 프로세스 (1) 2024.12.06 [FoodFlow] ERP 시스템 개발 기록 - 수정 및 리빌드 중 (1) 2024.12.04 식당 관리 프로그램 FoodFlow 개발 1일차 (1) 2024.12.02 이전글이 없습니다.댓글